Wednesday, December 23, 2015

Austen Card Set 1

In a continuing homage to Jane Austen's December birthday, this is the first Austen-themed card set I ever created. My Austen stamps had previously gotten a small work out on a scrap paper notepad and a couple last minute bookmarks, but nothing strenuous.


Of my multi-colored, pre-cut card bases, somehow the salmon/coral colored bases have been my least frequently used. Wanting to reduce my stash, I teamed the coral card bases with some matching ribbon and white lace from my stash, along with a stamp from my Austen Gallery "Jane Austen" set.
Here's how this card came together:
  • Die cut 6 pieces from the DCWV Luxury Stack using Spellbinders Label Five die, sponge edges with Distress vintage photo ink. Stamp Austen stamp using StazOn ink. (Remember in my last post when I said I didn't have any StazOn and used Versafine on the coated paper instead? That was this card. Yes, it really took over a week to dry! Don't do that at home, folks.)
  • Cut banners from DCWV Dear Jane Stack, stamp coordinating Austen quote with StazOn ink.
  • Stamp card base with Papertrey Ink's "Delightful Doilies" in white ink to create a subtle background. Glue lace to right edge of card front.
  • Tie ribbon to die cut, then slide in feather and set using glue dot. I also added a dab of glue to the back of the ribbon to keep the bow from sliding sideways.
  • Cut paper doilies in half and glue to back of die cut, then glue the set to card.
  • In preparation for adhering the sentiment banner, I added some random coral polka-dotted sticky flags to the card first, then adhered the banner using pop dots. Finished!


Thursday, December 17, 2015

Austen Card Set 2

I am a big Jane Austen nerd. I love her sassy, humorous writing and her tongue-in-cheek observations about gender interactions in Regency era England. Miss Austen’s writing was brave for its time, yet is still pleasant to read even today. Naturally following my love of Jane Austen’s writing is my love of Austen-related papercrafting items. My collection of known Austen-themed stamps is just about complete, and sometimes I make sets of cards for the Jane Austen Society of North America (JASNA) just to do something productive with them. This month, I decided it was time for some Austen crafting, and sat down to make a set of 6 “thank you” cards for JASNA.

When I started these cards, it was with the idea that I would use a die cut panel over a contrasting paper, both adhered to a coral-colored card base. I happen to have a bunch of the coral card bases, and few uses for them under ordinary circumstances. Appropriately, I decided to use paper from the “Dear Jane” cardstock stack by DCWV for the die cut panel, using a Spellbinders Ornate Squares die. The paper I chose was a 12 x 12 coated green paper with pink rose and metallic gold filigree accents, with background text from “Sense and Sensibility” printed in a slightly darker green. For the background contrasting paper, I originally choose some old time-darkened encyclopedia pages a friend and I scored at a going-out-of-business rummage sale. However, once I trimmed the margins from the pages and cut them to size for my panels, I realized the two papers together were much too busy. The cut encyclopedia pages went into my scrap drawer, where I found some very thin white tissue salvaged from recent mail order packaging. With the swap of tissue for encyclopedia paper also came the addition of lace and ribbon.


On to the fun part: putting it all together. Thankfully, I’m not as much of a perfectionist in papercrafting as I used to be, because I royally messed up the look of the tissue paper base layer by gluing it down with Beacon 3-in-1 liquid glue. My rationale was that everything else on this card would be adhered to the tissue base layer, so the tissue needed to have a firm hold on the card base. After the liquid glue fail on a few cards, I next tried my Tombow adhesive runner. Nope. That showed through the tissue just as badly. Next up: glue stick. Guess what works well with tissue paper? Glue sticks. Now I know. Now you know, too, and hopefully have been saved some tissue-papercrafting frustration.

While I waited for the tissue adhesives to dry, I used jet black StazOn ink to stamp a thank you sentiment from Papertrey Ink’s SimplyJane stamp set onto the die cut coated paper and added some champagne-colored rhinestones. The last time I stamped on coated paper, I didn’t have any StazOn ink and used Versafine instead, thinking it much less likely to smear than pigment ink. A WEEK later, I still had to handle the images carefully to avoid smearing! While waiting, I also used the coordinating die set to cut out a pair of Regency-dressed female silhouettes from dark gold DCWV  Glitzy Glimmer paper glued to a stronger paper base.

Once the tissue base layer was down and dry, I (successfully) used Beacon liquid glue to affix a layer of wide lace right down the middle of the card, then topped it with a thin coral ribbon. Over the lace and ribbon, I glued the stamped die cut down and added a little script washi tape to the top prior to adding the silhouette die cuts with pop dots.

Monday, November 23, 2015

"Little Things" Tag

My first real tag creation was inspired by an upcoming baby-arrival gift. The gift looked so lonely in its envelope that I decided a fancy tag needed to keep it company during its U.S. Postal Service journey.

  • The tag started with a base made from recycled manila folders, sent to me in a care package made from a friend's craft stash.
  • I sponged tea dye and vintage photo Distress inks alternately all over the tag, edging it with the vintage photo ink, then flicking a bit of water to get the water-distressed spots.
  • I stamped two alternating corners with a Flonzcraft art nouveau stamp in tea dye Distress ink.
  • The sentiment stamps are in vintage photo Distress ink and from KaiserCraft "Furry Friends" set, which I cut in half to make stamping individual definitions easier.
  • The edges needed an extra something, so I pulled out my gold metallic Gelato and rubbed some along the tag edges.
  • The cloudy texture behind the main sentiment journal card is actually a twice-used dryer sheet, folded in half and with the top and bottom edges hand-ripped.
  • The journal card is from the Authentique "Durable" stack, die cut with Spellbinders Nestabilities Labels Five, and edge-inked with vintage photo Distress ink.
  • Finishing touches: a strip of Little B gold metallic rose washi tape under the bottom left side of the dryer sheet, a glittered gold star on the die cut journal card, and a strip of cotton ribbon through the tag hole.


Entered in:
613 Avenue Create - Challenge #151 anything goes
Aud Sentiments - Challenge #145 anything goes
Brown Sugar - Challenge #173 anything goes 
Craft Your Passion - Challenge #289 anything goes
Crafting From The Heart - Challenge #87 anything goes 
Create And Inspire - Challenge #34 anything goes
Creative Fingers - Challenge #98 anything goes
Not Just Cards - Challenge #26 November anything goes

Penny's Paper-Crafty - Challenge #254 anything goes
Simply Papercraft - Challenge #18 anything goes 
Sparkles Monthly - Challenge #74 Anything But A Card
The Crazy Challenge - #211 Everything Goes
Word Art Wednesday - Challenge #210 anything goes

Monday, November 16, 2015

Masculine Birthday Card

I have spent most of 2015 in a very remote town that gets mail once a week… highly dependent upon weather. Mail day pretty much always feels festive for me due to my excitement level about mail in general, and specifically because I usually get either cards, care packages, or fun mail order stuff each week. That said, the postman is a nice acquaintance due to the amount of time I spend at the post office on mail days, both for my own mail and to help haul mail for a couple other folks. So when he mentioned his birthday was coming up, it was CARD TIME! I did not want to spend hours on one card (which is a frequent occurrence for me), so I came up with a simple masculine card design that took me about 15 minute to put together after the initial layout & paper selections. I liked the design so much that I made a second card for another upcoming birthday and a third card for my personal stash.

On an off-white card base, I glued down patterned paper from DCWV’s “Tattered Time” 4"x6" mat stack. I die cut a rounded clip embellishment from Papertrey Ink’s“Clip Tips” set from ivory cardstock and sponged it lightly with vintage photo Distress Ink, then stamped it in the same ink using a round arrow from the coordinating stamp set.


The die cut clip embellishment was a great addition to a square photo frame paper from We R Memory Keepers “Indian Summer” Albums Made Easy set. The Albums Made Easy set was an impulse sale buy because it was over half off and I knew the colors would coordinate with others in my stash; I’m so glad I grabbed it. I glued the clip to the paper frame, then adhered the frame off-kilter on the front of the card. I couldn’t make the frame as asymmetrical as I originally wanted, because the card wouldn’t have fit in its envelope! Once adhered, I stamped a birthday sentiment from Papertrey Ink’s “Movers & Shakers Sentiments” set, and stamped the second coordinating sentiment inside the card using crisp onyx black Versafine ink.


Entered in:
613 Avenue Create - Challenge #150 anything goes
A Bit More Time To Craft - Challenge #8 anything goes
Craft Stamper - November "Take A Stamp" Challenge
Craft Your Passion - Challenge #288 anything goes 
Crafting From The Heart - Challenge #86 anything goes
Crafts Galore Encore - "Use a Stamp or Digi Image" Challenge
Crafty Hazelnut's Patterned Paper - November Challenge anything goes
Create and Inspire - Challenge #33 anything goes
Creative Fingers - Challenge #97 anything goes 
Fan-Tastic Tuesday - Challenge #111 anything goes/twist of "B" (for brown/birthday!) 
Not Just Cards - Challenge #26 November anything goes
Simply Papercraft - Challenge #17 anything goes 
Word Art Wednesday - Challenge #209 anything goes 

Monday, November 9, 2015

You Light Up My Life

This was a quickie card, inspired by Shopping Our Stash's "Light My Fire" challenge. As soon as I saw the challenge, I knew I had the perfect, until-now-unused stamp sitting in my collection.


When I finally sat down to make the card days later, I decided to use a partially-altered kraft card base that has been sitting on my desk for about a month. The card base was originally an idea I was toying with for my Spooky Halloween card set (sponged black pigment ink background instead of the black cardstock background I went with), that ended up being a dumping ground for a leftover batch of customized modeling paste. The customized modeling paste had added black acrylic craft paint and Prisma ultra fine multi glitter. I smoothed the leftover paste into a very fine layer over the sponged black ink using an old plastic gift card, and a funny thing happened. The Prisma glitter that normally looks very white? When the modeling paste was thinned out, the exposed glitter was suddenly only green, blue, and red. No white to be seen! It's amazing how our eyes process color!


So over this existing card base, I just did a simple Versamark stamp of Hot Off The Press' "Light Bulb", covered with white embossing powder, then added an alpha-stamped strip of silver washi tape. I liked the somewhat-accidental "light" halo around the light bulb, leftover from the embossing powder catching on the modeling paste. For the alphabet stamping, I tried both my black StazOn and Versafine on the metallic washi tape, but neither turned out very dark. The final version used StazOn ink to prevent smearing.


{crafted while listening to David Lagercrantz's "The Girl in the Spider's Web" audiobook}

Entered in:
613 Avenue Create - Challenge #149 anything goes
A Bit More Time To Craft - Challenge #7 anything goes
Crafting By Designs - anything goes challenge
Crafting From The Heart - Challenge #85 anything goes 
Crafts Galore Encore - "Use a Stamp or Digi Image" Challenge
Create and Inspire - Challenge #33 anything goes
Creative Fingers - Challenge #97 anything goes 
Creative Moments - Challenge #80 anything goes
Papertake Weekly - Challenge anything goes
Shopping Our Stash - Challenge #226 "Light My Fire" - Top 3 Winner!
Sisters of Craft - November Challenge anything goes
Word Art Wednesday - Challenge #208 anything goes
Your Scrapbook Place - November Challenge anything goes 

Challenge Accepted! "3 Patterned Papers" Scrap Card

Last year, I discovered Papertrey Ink’s Stamp-A-Faire and had a lot of fun (and not a lot of sleep while playing along. Unfortunately, I didn’t get to participate this year, but I did complete one of their challenges just for the fun of it. The challenge was to use 3 different patterned papers on one card or project.

I dug through my recently reinvigorated scrap stash; a friend recently sent me a care package of scraps and elements from her craft stash. Aren’t fellow crafting friends the best? I found two lovely patterned paper scraps from my friend’s stash, and a leftover panel from one of the Graphic 45 "Couture" papers. Perfect! Almost. As usual, I laid everything out and felt like something was missing. I dug through the care package scraps and found a sheet of matte gold paper covered in tiny metallic gold polka dots. The shininess of the gold polka dots was appropriately eye catching when added as a small accent along the edge of the Graphic 45 fashion panel. I happened to have the coordinating Hampton Art Graphic 45 Couture (set 3) stamps with me, so I added a small swirled costume-jewelry stamp with gold embossing powder* to the fashion panel to complement the shiny gold accent paper. After adhering all of my patterned papers to an off-white card base, I added a hint of embellishment to the black & white flowered border of the fashion panel by making small pearls in the center of each flower using VivaDécor’s Pearl Pen in ice white.


I grabbed this Pearl Pen to try out and one in silver using coupons at Joann Fabric And Craft Store a few months ago, and I really like them. They are great for adding a pearlescent touch of any size, as opposed to the larger fixed sizes of adhesive pearl embellishments. I haven’t tried writing any words with them, because I’m not that great at consistently applying steady enough pressure to produce a nice-looking word.

*On a side note, I just realized that my gold, silver, and clear embossing powders are from Personal Stamp Exchange, and are nearly 20 years old! Those must be among the oldest things in my craft stash. What do you think your oldest stash items are?


Entered in:
613 Avenue Create - Challenge #149 anything goes
A Bit More Time To Craft - Challenge #7 anything goes
Artistic Inspirations - Challenge #144 anything goes/feminine
Catch The Bug - anything goes challenge
Craft Your Passion - Challenge #287 anything goes
Crafting By Designs - anything goes challenge
Crafting From The Heart - Challenge #85 anything goes
Crafts Galore Encore - "Use a Stamp or Digi Image" Challenge
Crafty Hazelnut's Patterned Paper - November Challenge anything goes
Create and Inspire - Challenge #33 anything goes
Creative Fingers - Challenge #97 anything goes
Creative Moments - Challenge #80 anything goes
Not Just Cards - Challenge #26 November anything goes
Papertake Weekly - Challenge anything goes
Scrapper's Delight - Challenge #50 anything goes
Simply Papercraft - Challenge #17 anything goes
Sisters of Craft - November Challenge anything goes
Word Art Wednesday - Challenge #208 anything goes
Your Scrapbook Place - November Challenge anything goes

Monday, November 2, 2015

Autumn Gift Box

And now for something a little different….

For some, Starbuck’s Pumpkin Spice Latte heralds the true beginning of autumn. I may not be one of those folks, but that didn’t dampen my excitement when some instant Starbucks Via arrived in a recent care package… in Pumpkin Spice Latte flavor! Really, it doesn’t just say “Pumpkin Spice.” There were enough to share, so I pulled out a couple for friends. Then I added a couple Spiced Apple Cider K-Cups. Then I added an extra Halloween decoration sign I made last year; this one asked “Got Candy?” Once I had this smile pile of goodies, I didn’t want to merely plop them into my friends’ hands; thus started my quest for a suitably decorated container.

My breakthrough came when I spotted an old oatmeal box in the pile of boxes on my desk that are awaiting their turn at being made into beautiful die cut elements. I pulled out one of my backs of reusable packaging materials, and was surprised to find that I actually had orange tissue paper! I also had some green plastic strapping bands that I pulled off of a box last month and the shade of green went well with the orange, so I added that to my materials pile. The front of the box was going to need more embellishment than just the strapping band, so I searched through my stash of paper for a few coordinating pieces. It took me 2 or 3 tries before I settled on my final paper/die cut/layer combination.

To start my gift packaging, I mixed a little red and metallic gold acrylic craft paint into a larger amount of orange acrylic paint, then used a foam brush to paint two layers onto the outside of the oatmeal box.


The paint somewhat obscured the text on the box, although it was much better after gluing on the orange tissue paper. I used a good old glue stick to adhere the tissue to the box, having learned last week how dreadful other adhesives look through tissue paper. When I laid the tissue on the sticky glue, I intentionally wrinkled the paper a little so that the half-inch tissue border I left over the top edges of the box would have a bit of wave texture. The oatmeal box ingredients still showed through a bit on the sides of the box, but a second and third layer of tissue took care of that.


After trimming the tissue paper edges, I used some E6000 glue to affix the green plastic strapping band all the way around the middle of the box. That glue choice may have been overkill, but I didn’t want that band to move. Ever. My original idea for the centerpiece embellishment on the front of the box was to use a stamped sentiment about autumn as the focal point of multiple die cut layers, but it turned out that I didn’t have any autumn-related stamps with me. Instead, I found a delightful little vintage piece in Authentique’s “Thrilling” Halloween stack that says “A treat is better shared with a friend.” I cut that out and stuck it to a fancy die cut dark yellow glitter cardstock piece (Spellbinders Shapeabilities Ornate Squares, DCWV Glitter Brights stack). The base layer of my embellishment was die cut using Spellbinders Nestabilities Labels 13 from white polka dotted orange paper from the Authentique stack. Once I did the final layout prior to gluing everything down, I realized that there wasn’t enough contrast between the yellow glitter and the orange polka dot papers. So I die cut a smaller Spellbinders Label 13 from DCWV black Glitzy Glitter paper, and that added the lacking contrast. I adhered the bottom two layers together, glued it to the box front over the strapping band, then added the top sentiment layer with pop dots.


{Crafted while listening to Florence + the Machine’s “How Big, How Blue, How Beautiful” album}

Entered in:
4 Crafty Chicks - Challenge #270 anything goes
613 Avenue Create - Challenge #148 anything goes/host gift 
A Bit More Time To Craft - Challenge #7 anything goes - Winner! 
Altered Eclectics - November Challenge anything goes
Artistic Inspirations - Challenge #143 anything goes
Craft Your Passion - Challenge #286 anything goes
Crafting From The Heart - Challenge #84 anything goes 
Crafts And Me Inspiration - November Challenge "Autumn/Fall Colours"
Crafty Girlz - Challenge #8 anything goes
Crafty Hazelnut's Patterned Paper - November Challenge anything goes
Create and Inspire - Challenge #32 anything goes 
Creative Fingers - Challenge #96 anything goes
Creative Moments - Challenge #80 anything goes
Eclectic Ellapu - Purple Team November Challenge "Altered Art" 
Fairytale Challenge - #129 box or album
Glitter 'N' Sparkle - Challenge #161 anything goes
Lunagirl Moonbeams & Lunagirl.com - November Thanksgiving/Harvest/Gratitude challenge 
Not Just Cards - Challenge #26 November anything goes
Papertake Weekly - Challenge "Take Your Pick"
Penny's Paper-Crafty - Challenge #251 anything goes
Simon Says Wednesday Challenge - anything goes
Simply Papercraft - Challenge #16 anything goes
Sisters of Craft - November Challenge anything goes
Suzy Bee's Bloomin' Challenge - #104 anything goes/shabby chic
The Crazy Challenge - #209 vintage
Word Art Wednesday - Challenge #207 anything goes
Your Scrapbook Place - November Challenge anything goes

Sunday, October 25, 2015

Scrap Halloween Cards

One of the fun parts of making cards is all the scraps generated that I can’t seem to throw away.

One of the frustrating parts of making cards is all the scraps generated that I can’t seem to throw away.

Yup. I have a Pinterest board dedicated to card ideas for utilizing paper scraps, precisely because of my scrap hoarding problem. Really, we pay good money for our beautiful papers, so why throw way those pieces that are sure to come in handy later? Am I right? ;)

For the second time in a month, I actually have utilized scraps; though this time I made a set of four cards using mostly left over elements & scraps from my spooky forest cards from my last blog post. I was left with strips of Authentique & DCWV Halloween cardstock from cutting the papers down to 4.25” x 5.5” card size, extra aluminum foil strips & Hershey’s Kiss foil wrappers stamped with “Spooky”, and Echo Park Paper Co.’s“Happy Halloween” die cuts of witches’ boots, bats, and spider webs. The die cuts were the result of an evening spent getting rid of the pile of cardboard packaging on my desk by continuously die cutting while listening to pod casts. I ended up with a pile of random die cuts while reducing the pile of thin food packaging boxes. I felt so productive and considerate towards my future-card-making-self. However, my husband caught on to the fact that I’m trying to re-use our food packaging as much as possible instead of throwing it away, and I now have another pile larger than the first! What a good excuse to break out my newest, unused die sets from my latest craft supply order, huh?


Other than layouts, the only things I did for these cards were:
  • trimmed some rough edges from the scrap paper strips,
  • added black Colorbox pigment ink to the spider webs and bats,
  • added a little black ink topped with silver Colorbox pigment ink to the witches’ boots,
  • and sponged the card edges with black ink for contrast.
All elements adhered liberally with glue stick, Tombow rolling dot adhesive, and Beacon 3-in-1 liquid glue, and voilà! Quickly completed scrap cards!


{Crafted while listening to “The Night Eternal” audiobook by Guillermo Del Toro and "Welcome to Night Vale" podcasts}


Entered in the:
4 Craft Chicks - Challenge #269 Happy Halloween
613 Avenue Create - Challenge #147 anything goes
A Bit More Time To Craft - Challenge #6 anything goes
Artistic Inspirations - Challenge #142 anything goes/Halloween
Brown Sugar - Challenge #169 anything goes
Cardz 4 Guyz - Challenge #93 I Put A Spell On You 
Chocolate, Coffee & Cards - Challenge #102
Craft Stamper - October take a technique challenge
Craft Your Passion - Challenge #284 anything goes
Crafting By Designs - month-long October anything goes challenge
Crafting From The Heart - Challenge #82 anything goes
Crafts 4 Eternity - Challenge #249 Halloween
Crafts Galore Encore - October Halloween or Make A Card challenge
Crafty Girlz - Challenge #8 anything goes/bewitched
Craftyhazelnut's Patterned Paper Challenge - October anything goes
Create And Inspire - Challenge #32 anything goes
Creative Fingers - Challenge #96 anything goes
Creative Moments - Challenge #79 anything goes
Eclectic Ellapu - Purple Team's Halloween/Dark/Horror challenge
Emerald Creek Dares - Tricks & Treats
Get Creative - Challenge #26 Halloween Colors 
Moving Along With The Times - Challenge #6 Halloween
Not Just Cards - Challenge #25 October anything goes
Scrapper's Delights - Challenge #49 Fall/Halloween
SimonSaysStamp.com Monday Challenge - The Monster Mash
Simply Papercraft - Challenge #16 anything goes
Sisters of Craft - October anything goes challenge
The Paper Shelter - Challenge #224 Trick or Treat 
Try it on Tuesdays - Frightening/Halloween challenge
Vintage Stamping - Challenge #37 Use a Die/Dies
Your Scrapbook Place - October anything goes challenge

Tuesday, October 20, 2015

"Spooky" Halloween Cards

October is one of my favorite times of the year. It simultaneously represents the promise of harvest season and the fun of Halloween costumes and shenanigans, while also signaling the final end of summer and the real transition into winter weather. While I always mean to start autumn or Thanksgiving cards, I pretty much always get sidetracked by the fun of Halloween cards. It’s a time of year when no one minds receiving creepy cards, and I enjoy making creepy cards! This year, I found my eye drawn both to my Oxford Impressions “Danse Macabre” stamp set and Xcut’s forest Build-A-Scene die set, neither of which had been broken in yet.
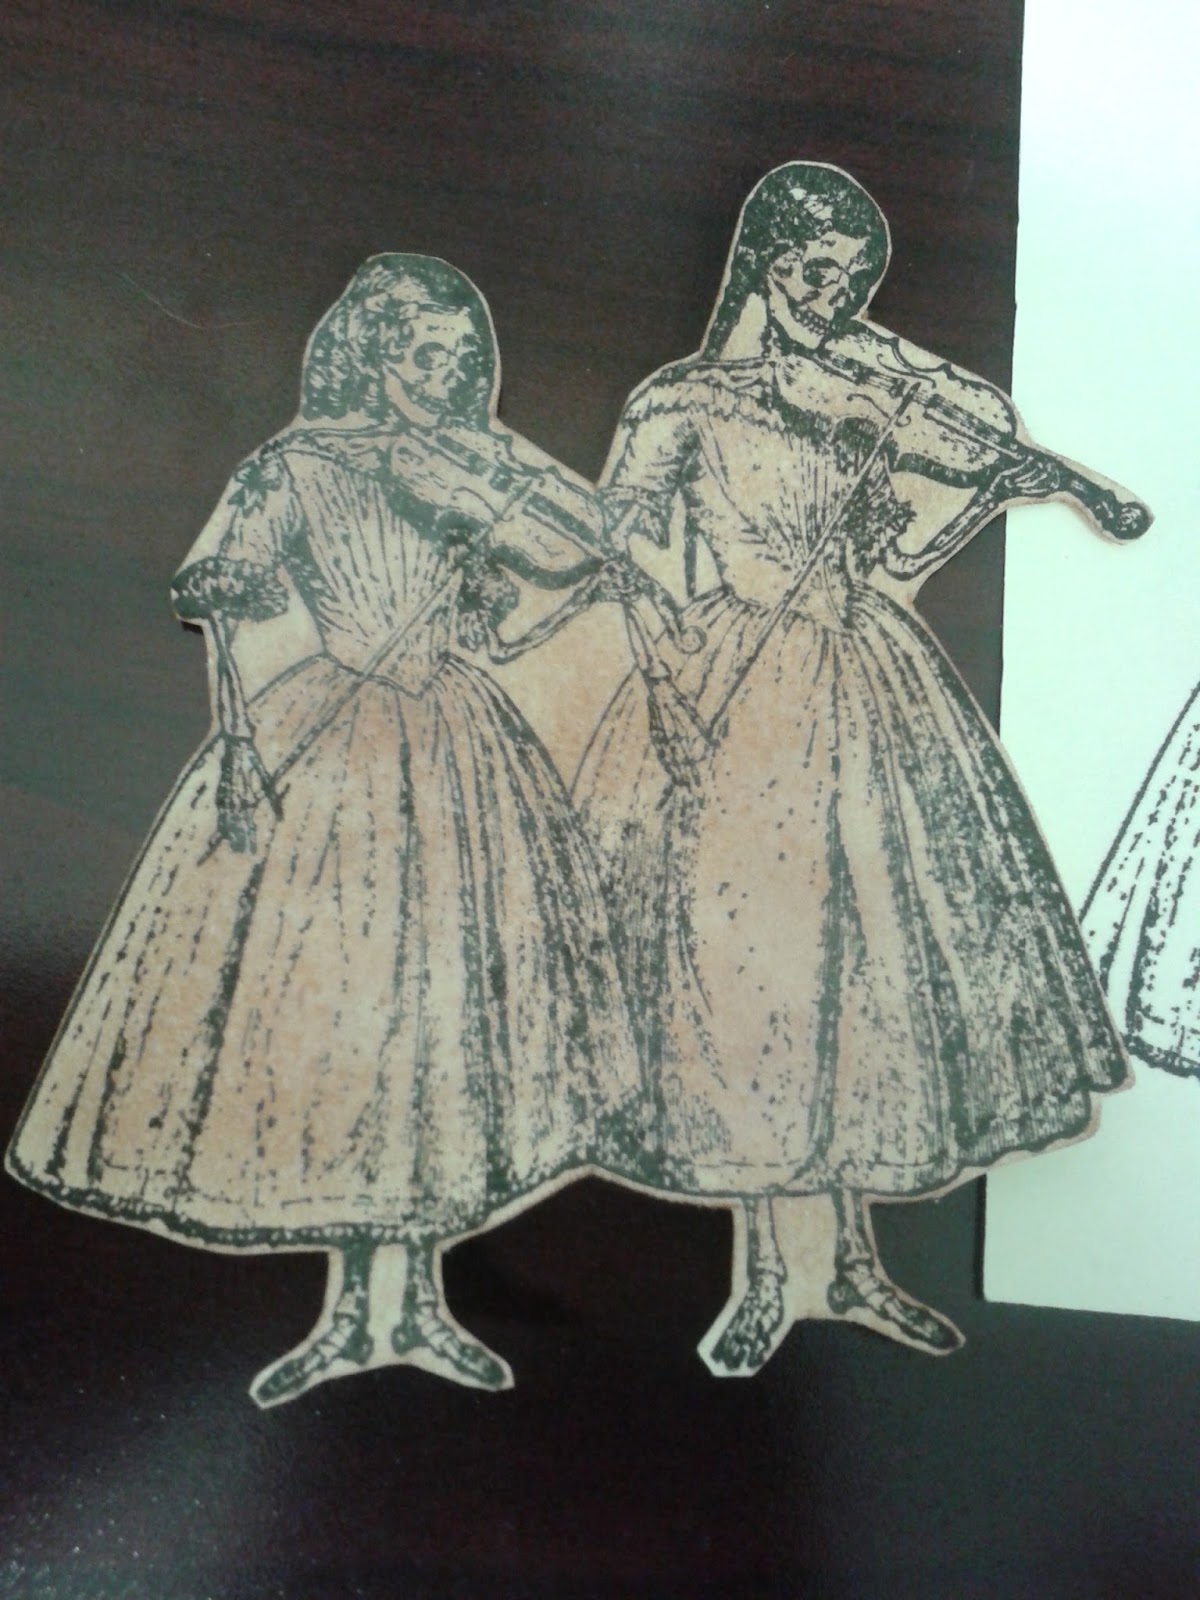
The stamp that really grabbed my eye as the inspiration for this project was a pair of violin-playing skeleton sisters. I stamped several of this image on ivory cardstock using onyx black Versafine ink, then used a sponge to rub some vintage photo Distress Ink over all of the images.


The images needed something extra, so I decided to try salting the ink for the first time. Just experimenting, I spritzed the sheet of inked images with water, then sprinkled salt over them and waited for them to dry. Once dry, I dusted off all the salt and fussy cut my musical skeleton images. Seeing the end product, I think I probably did not wet the images enough, but at the time I was concerned about ruining them with too much water. The end salt effect was subtle, but perfect for my images.


While I waited for the salted images to dry, I die cut the first layer of forest-scene using cardstock from Authentique’s “Thrilling” 6" x 6" collection and one of the DCWV Halloween mat stacks, and cut the second layer from black Darice Core’dinations cardstock. I decided to mat all my layers on a kraft card base, with a 4.25” x 5.5” black cardstock background mat to add spooky depth with the addition of pop dots.


After laying out my layers, I realized two things: I needed additional depth on my black background mat, and the front of my card needed additional embellishment. I solved the first issue by using a bare twiggy branch from the same “Danse Macabre” stamp set to watermark the image on the black background mat and the black die cut forest layer using Versamark ink. Unfortunately, this blended in too much on the background mat once it dried and didn’t give me the additional depth I was looking for. I re-stamped the branch image in Versamark ink on the background mats, but this time I wet embossed it using a black embossing powder. That did the trick!


The second issue was solved a few days later when my new pad of jet black StazOn ink arrived in the mail. After digging around in one of my random scrap stashes (yes, I have more than one), I decided to use my StazOn ink to stamp on aluminum foil to add a little sparkle to the cards without clashing with the dark forest scene. I also had some spiders and spider webs (Echo Park Paper Co.’s “Happy Halloween” dies) already sitting on my desk from an overly productive random die-cutting session from a couple weeks ago. I rubbed the die-cuts in black Colorbox pigment ink, and used a “Spooky” stamp from PinkPaislee/House of Three’s “Phantom” Halloween stamp set* to stamp on the aluminum foil.


I carefully positioned and adhered my musical skeletons behind the top die cut forest layer, then adhered it to the black second forest layer. I glued the overlapping foil sentiment and die-cut spider to the top left corner of the card front. At some point in the card-making process, I realized that these were pretty involved cards and would make rather awesome annual Halloween decorations. With that in mind, after I glued the black background mat to the kraft card base, I punched two holes about half an inch in from the top corners of the front of the card so that a ribbon hanger can easily be added later. I figure that once the recipients are done enjoying the sentiments inside the card, they can cut the back of the card off and will be left with a nice hanging decoration. After punching the future-ribbon holes, I added pop dots around the perimeter and adhered the front two cardstock layers to the background mat.


As the final touch, I cut lengths of orange ribbon as decoration hangers to include in the envelope with the cards. The ribbon is a sentimental touch, having been salvaged from table décor at a friend’s wedding.


*As a side note, this is my first and only PinkPaislee clear stamp set. This set of clear cling stamps is of very poor quality; I feel like I’m going to tear each stamp from the amount of force I have to apply to pull the stamps off the sheet for their first use. So I guess I’m saying caveat emptor and thank goodness I bought them on sale!


{Crafted while listening to my 2015 Halloween mix.}


Entered in the:
613 Avenue Create - Challenge #146 anything goes
A Bit More Time To Craft - Challenge #6 anything goes 
Artistic Inspirations - Challenge #142 anything goes/Halloween
Cardz 4 Guyz - Challenge #93 I Put A Spell On You 
Chocolate, Coffee & Cards - Challenge #102
Craft Stamper - October take a technique challenge
Craft Your Passion - Challenge #284 anything goes
Crafting By Designs - month-long October anything goes challenge
Crafting From The Heart - Challenge #82 anything goes
Crafts And Me - October Halloween challenge 
Crafts Galore Encore - October Halloween or Make A Card challenge
Crafty Catz - Challenge #297 anything goes
Crafty Girlz - Challenge #8 anything goes - Winner! 
Craftyhazelnut's Patterned Paper Challenge - October anything goes
Creative Fingers - Challenge #95 anything goes
Creative Moments - Challenge #79 anything goes
Eclectic Ellapu - Purple Team's Halloween/Dark/Horror challenge
Fantasy Stampers - Challenge #47 Fright Night!
Glitter 'N' Sparkle - Challenge #159 Halloween -Top 3! 
Haunted Design House - Holy Hell! It's Halloween challenge
Left of Center - Challenge #100 Good Old Fashioned Horror 
Lunagirl Moonbeams & Lunagirl.com - October Gothic challenge
Moving Along With The Times - Challenge #6 Halloween
Not Just Cards - Challenge #25 October anything goes
Scrapper's Delights - Challenge #49 Fall/Halloween
SimonSaysStamp.com Monday Challenge - The Monster Mash
Simply Papercraft - Challenge #15 anything goes 
Sisters of Craft - October anything goes challenge
Try it on Tuesdays - Frightening/Halloween challenge
Vintage Stamping - Challenge #37 Use a Die/Dies
Your Scrapbook Place - October anything goes challenge